
To bind off knitting means to close all the live stitches, the ones sitting on the needle, so the knitting won’t unravel when taken off the needles.
There are several ways to bind off a knitting project. The characteristics of the project determine which method is more suitable.
For example, if your fabric is stretchy you will want a stretchy edge as well. On the other hand, a project that needs to hold its shaping may call for a more sturdy selvage.
Cast off vs. bind off – is there a difference?
Some knitters and patterns use the term bind off and others use cast off, but we’re all talking about the same thing.
It’s just variations depending on if you speak US English or British English. UK knitters use cast off, and US knitters use bind off.

The basic bind off
The basic bind off is easy to knit, fast to do and creates a pretty chain of V:s along the edge. I like it and use it a lot for everything from socks to sweaters and washcloths.
This bind off is quite inelastic and some knitters would never use it to bind off ribbing, for example.
But, I think it works just fine if I use a bigger needle size and make sure not to tug the yarn. I stop and pull my bind off now and then to make sure that it’s not too tight. If it is, I rip back and redo the bind off with a bigger needle.
I like to use this for stockinette stitch. When I knit flat I do it on a knit row and in circular stockinette, all rows are knit rows!
How to finish your knitting the easiest way
- Knit 2
- Use the left needle to pass the first knitted stitch on the right needle over the second knitted stitch.
- Knit 1
- Repeat steps 2 and 3 across the row and fasten off.
What to do with the last stitch of the finishing row?
After finishing your bind-off row you end up with one last stitch but nothing left to pass it over. But on earth what should you do with this stitch?!
The easiest and most common way is to just cut off the yarn strand leaving a few inches of tail and pull the tail through your last stitch.
This method stops the last stitch from unraveling. You can choose to either weave in the tail, or use it to sew your finished piece to another piece of knitting. Like the shoulder seam of a sweater, for example.
A neater way to finish the last stitch of the row knitting flat
The last stitch of the bind-off row can look loose and sloppy.
If you’re going to seam that edge to another, this ain’t a problem because it won’t show. But for an item with visible selvages, it’s nice if the finishing off is a bit neater.
I have found several ways to do this while researching this post, this is the three I like the most!
The first method: This one is the easiest and fastest tip of the three! If you slip your first stitch of the row before your bind-off row this stitch won’t be as big as if you knit or purl it. It’s all you have to do, then bind off, cut the yarn, and pull it through your last stitch.
Actually I always slip my first stitch when knitting flat because I like the tidy look of the edges I get with this little trick!
Reading tip:
––> Four ways of knitting neat edges
The second method:
- Work your bind off until you have one stitch left on your left needle
- Use the right needle tip to lift up the stitch below the last stitch on your left needle
- Knit the lifted stitch together with the last stitch
- Pass 1 stitch over the last, as you normally do
- Cut your yarn and pull it through the loop as usual. This creates a tighter and much neater last stitch.
The third method:
- Work your bind-off row until you have two stitches remaining on your left needle (and one on the right)
- Make an SSK. Slip, Slip, Knit – To do an SSK you slip the stitches knitwise one by one, then transfer them back on the left needle and knit them together through the back loop.
- Pass on stitch over the other and finish off the last stitch by cutting your yarn and pull it through the last stitch.
A neat way to finish of the last bind-off stitch knitting in the round
When your knitting in the round you can use the same methods for binding off as when knitting flat. The only difference is how you finish the last stitch.
When you finish off projects knitted in the round on double-pointed needles or circulars the join between the first and the last stitch can be a bit uneven. But, of course, you can work around this too.
This knitting hack creates an extra stitch that binds the first and the last stitch of your binding-off row together seamlessly!
- Bind off all your stitches
- Pull the last stitch upwards to get a really big loop, a few inches or so, and cut the yarn at the top off your loop.
- Pull out the working yarn, the yarn attached to your yarn ball.
- Thread a needle with your tail
- Find the first stitch you bound off and go in under the two loops, it doesn’t matter if you go from the right or wrong side here.
- Then find your last stitch and sew down in the center of it
- Pull the yarn to get the tension right and weave in your ends. No one is going to see where you started and finished your bind off!
Reading tip:
Want to know more about knitting in the round on a circular needle?
––> What to do if your circular needle is too long
––> Circular needles for beginners
––> Soften the cable on your circular needle
How to bind off knitwise and purlwise?
If your pattern tells you to bind off knitwise that means that you should use the knit stitch as you work the last row at the same time you finish off your knitting.
The same applies if the pattern says purlwise, then you work the last row with purl stitches.
You can also use a combination of knit and purl stitches for the last row. Read more about that below!
What does it mean to bind off in pattern?
This means that you bind off in the same stitch pattern that you’ve knitted in.
Should you bind off in pattern?
Well, some of us do and some of us choose to bind off with a knit row.
Both ways work just fine, none of them is wrong or has less function. But, it looks nicer if you bind off in pattern.
So if you’re going for a more polished and finished look and have done a project in a stitch pattern I think you should bind off in pattern too. This makes for a cleaner and less visible cast-off edge, and it’s all in the details, right?

How do you bind off in pattern?
To bind off in pattern means that you keep on knitting your stitch pattern at the bind-off row, exactly like you should have done for any other row.
The only difference is that you finish off the stitches as you go.
Watch me knit!
In this video, I show you how to bind off in pattern, first on a swatch of 1+1 ribbing and after that a piece of seed stitch.
If you like this kind of short instruction videos, please subscribe! I plan on doing them more frequently in the future as some of my previous videos have received a lot of love 🙂
Thank you for watching, subscribing, liking, and commenting on my videos!
How to finish off when knitting garter stitch
When you have knitted a piece of garter stitch and are about to bind off you do it with only knit stitches. This is because the garter stitch is built on only knit stitches.
Start the last row like this:
Knit 2 stitches, you now have 2 stitches on the right needle, pass the first stitch over the second stitch. You have bound off the first stitch. You only knit two stitches to get started, in the following steps you only knit one stitch at the time.
Knit 1, pass the first stitch on your right needle over the second.
Keep repeating this until you have bound off all stitches and only one stitch on your right needle remains. Cut your thread, leaving a 4-inch tail, and pull the thread through the last stitch to keep it from unraveling.
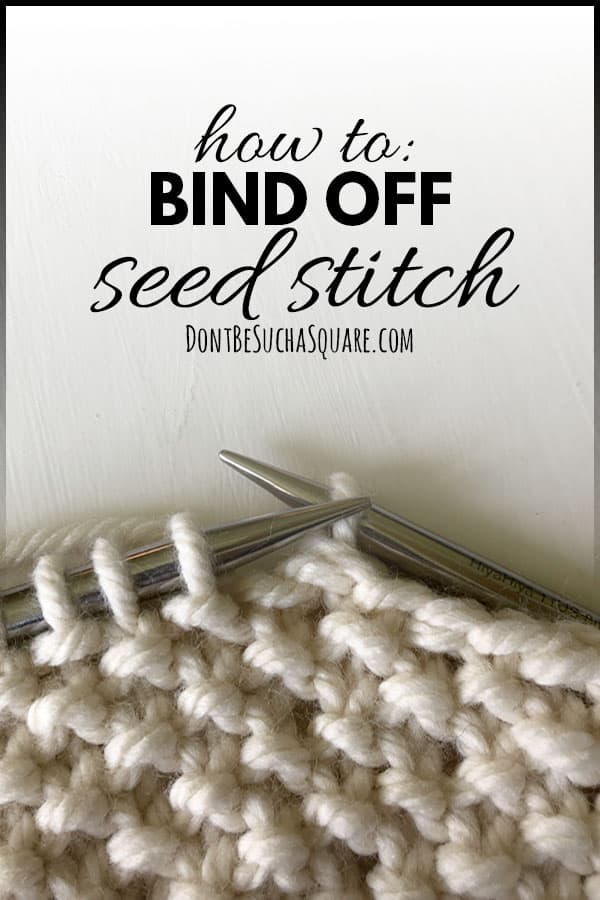
How to finish off a seed stitch pattern
Seed stitch is basically a knit-one, purl-one rib. But with the difference that the order of the stitches alternate so you always do a knit stitch above a purl and Vice Versa.
Seed stitch makes a tight fabric with a nice textured pattern, it’s reversible and lays flat. When you add the basic bind off to seed stitch the edge will be inelastic, and a good choice for a washcloth or an edge that you’re going to sew to another piece.
To bind off seed stitch in pattern do the basic bind off, but instead of knitting every stitch, work each stitch as if you were still doing seed stitch (knit the purls and purl the knits).
How to finish off ribbing
To bind off ribbing with the basic bind off you knit the knit stitches and purl the purl stitches. This looks great, but it’s not as stretchy as the ribbing itself which can be a problem for example if you use it at the cuffs of a seater and then want to pull up the sleeves.
If the elasticity of the edge isn’t crucial you can just use a bigger needle in your right hand and be careful not to pull too tight.
If you need more stretch, Jeny’s surprisingly stretchy bind off is more suitable. I describe this technique further down.
For example, 2+2 ribbing (2knit, 2purl) you do it like this:
Start the row like this: Knit 2 stitches, you now have 2 stitches on the right needle, pass the first stitch over the second stitch. You have bound off the first stitch. You only knit two stitches to get started, in the following steps you only knit or purl one stitch at the time.
- Purl the next stitch, you now have two stitches on the right needle, pass the old one over the new.
- Purl the next stitch, pass the old one over the new.
- Knit the next stitch, pass the old one over the new.
- Knit the next stitch, pass the old one over the new.
- Repeat these steps until you only have one stitch left on your right needle. Cut your thread, leaving a 4-inch tail, and pull the thread through the last stitch to lock it.
How to do a stretchy bind off
There are a bunch of stretchy bind-off methods to choose from but this one is my absolute favorite as it’s easy enough to remember, easy to knit, and does the work.
This technique works very well for everything that needs stretch like cuffs on mittens, socks, and sweaters. It’s also perfect for finishing off the brim of a beanie!
To make the bind off able to stretch we need to add more yarn to it than a regular bind off. This is done by making yarn overs (YO) between the stitches.
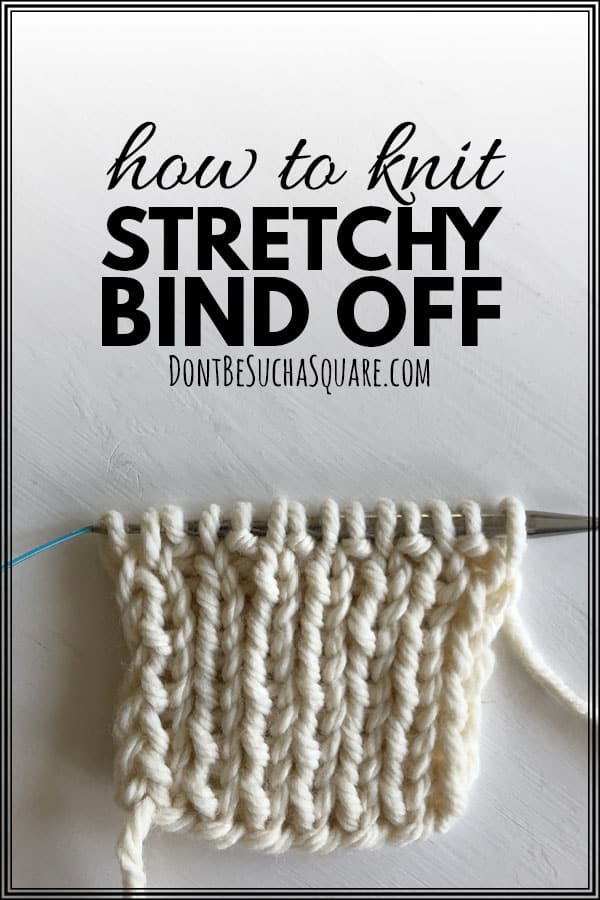
How to knit the stretchy bind off:
- Step 1: Work one stitch
- Step 2: Make a yarn over (YO)
- Step 3: Work one stitch
- Step 4: Pass both the first stitch and the YO over the second stitch
- Repeat steps 2–4 across the row.
Video: Stretchy bind off
In this video, I show you how I knit the stretchy bind off, I hope this will make it easier for you than just written instructions!
Jeny’s surprisingly stretchy bind off (JSSBO)
I stated above that this is my go-to bind off when I need something really stretchy. So, why is it so good? It is…
- Super-stretchy
- Pulling together really good after being stretched out
- Faster than many other stretchy bind-offs to knit
- Good looking!
Jeny Staiman invented this method and it was published in Knitty 2009. It’s quite similar to the method described above, but it uses two kids of yarn overs and you pass one stitch over two times instead of passing two stitches over one time. (If that last sentence makes any sense?!)
How to do Jeny’s surprisingly stretchy bind off
This method uses a backward yarn over, which means that you make the yarn over from below and behind.
In this bind off you always do a backward YO before a knit stitch and a regular YO before a purl stitch.
Because of the YO:s you pass over 1 stitch two times, instead of one time as for the basic bind off.
- Backward YO
- Knit 1
- Pass one stitch over (Use the left needle to pass the first knitted stitch on the right needle over the second knitted stitch)
- YO
- Purl 1
- Pass one stitch over, 2 times
- Backward YO
- Knit 1
- Pass one stitch over, 2 times
- Repeat steps 4–9 across row.
- Cut yarn and pull through the last stitch.
How to bind off at the beginning, middle or end of a row
Sometimes you have to finish off of some stitches on a row and keep working the remaining stitches.
This is useful if you’re knitting a sweater from the bottom and up need to bind off some stitches for the shaping of the armholes and the neckline.
At the beginning of a row
Begin the bind off like normal, but only finish as many stitches as you need. Then continue to knit after your pattern.
At the middle of a row
Work so many stitches as you need then, while following your stitch pattern, begin to pass just as in the basic bind off. Finish as many stitches as you need and then keep working your stitches to the end of the row.
How the next row should be done depends on what you’re knitting. If you’ve bound off for a neckline you need to work each side separately from now.
If you finished off stitches for a pocket or a buttonhole you may want to add the same amount of stitches on your next row. Then you need to cast on again.
At the end of a row
Knit for as long as you wish or our pattern calls for, and then start to pass stitches over until the row is finished.
Reading tip:
––> Try the three-needle bind off. With this technique, you can bind off and seam two pieces together at the same time. Clever right!?
Follow Don’t Be Such a Square on Pinterest for a neverending feed of techniques and knitting hacks!
